
Implementing FIDO2 Authentication: A Developer's Step-by-Step Guide
Discover the essentials of FIDO2 authentication implementation in this developer-focused guide.
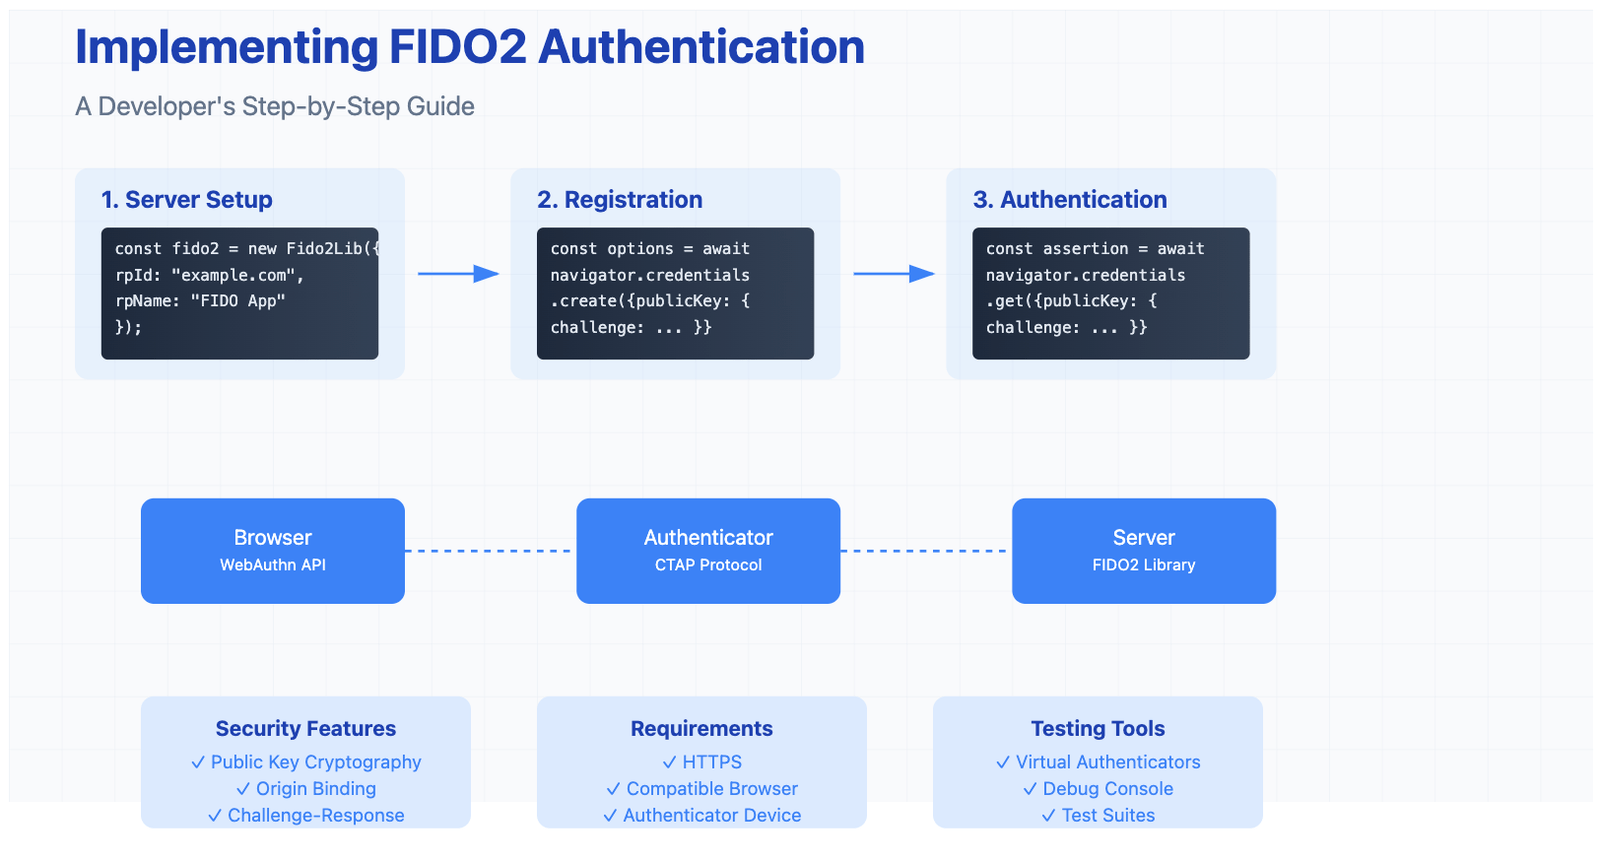
- Intro
- Why FIDO2?
- Implementation Overview
- Step-by-Step Guide
- Common Challenges & Solutions
- Testing Your Implementation
- Security Best Practices
Introduction to FIDO2 Authentication
FIDO2 is the latest set of specifications from the FIDO Alliance, aiming to enable passwordless authentication. It comprises two main components:
- WebAuthn API: A web standard published by the World Wide Web Consortium (W3C) that allows web applications to use public-key cryptography instead of passwords.
- Client to Authenticator Protocol (CTAP): A protocol that enables an external authenticator (like a hardware security key) to communicate with the client (like a web browser).
Key Benefits of FIDO2:
- Enhanced Security: Uses asymmetric cryptography, reducing the risk of credential theft.
- Improved User Experience: Eliminates the need for passwords, making authentication seamless.
- Phishing Resistance: Credentials are bound to specific origins, mitigating phishing attacks.
Why FIDO2?
Before diving into the implementation, let's understand why FIDO2 is worth your time:
✅ No More Password Headaches
- Zero password storage
- No reset workflows needed
- Reduced support costs
✅ Superior Security
- Phishing-resistant
- Uses public key cryptography
- Eliminates credential database risks
✅ Better User Experience
- Fast biometric authentication
- No passwords to remember
- Works across devices
Implementation Overview
Here's what we'll build:
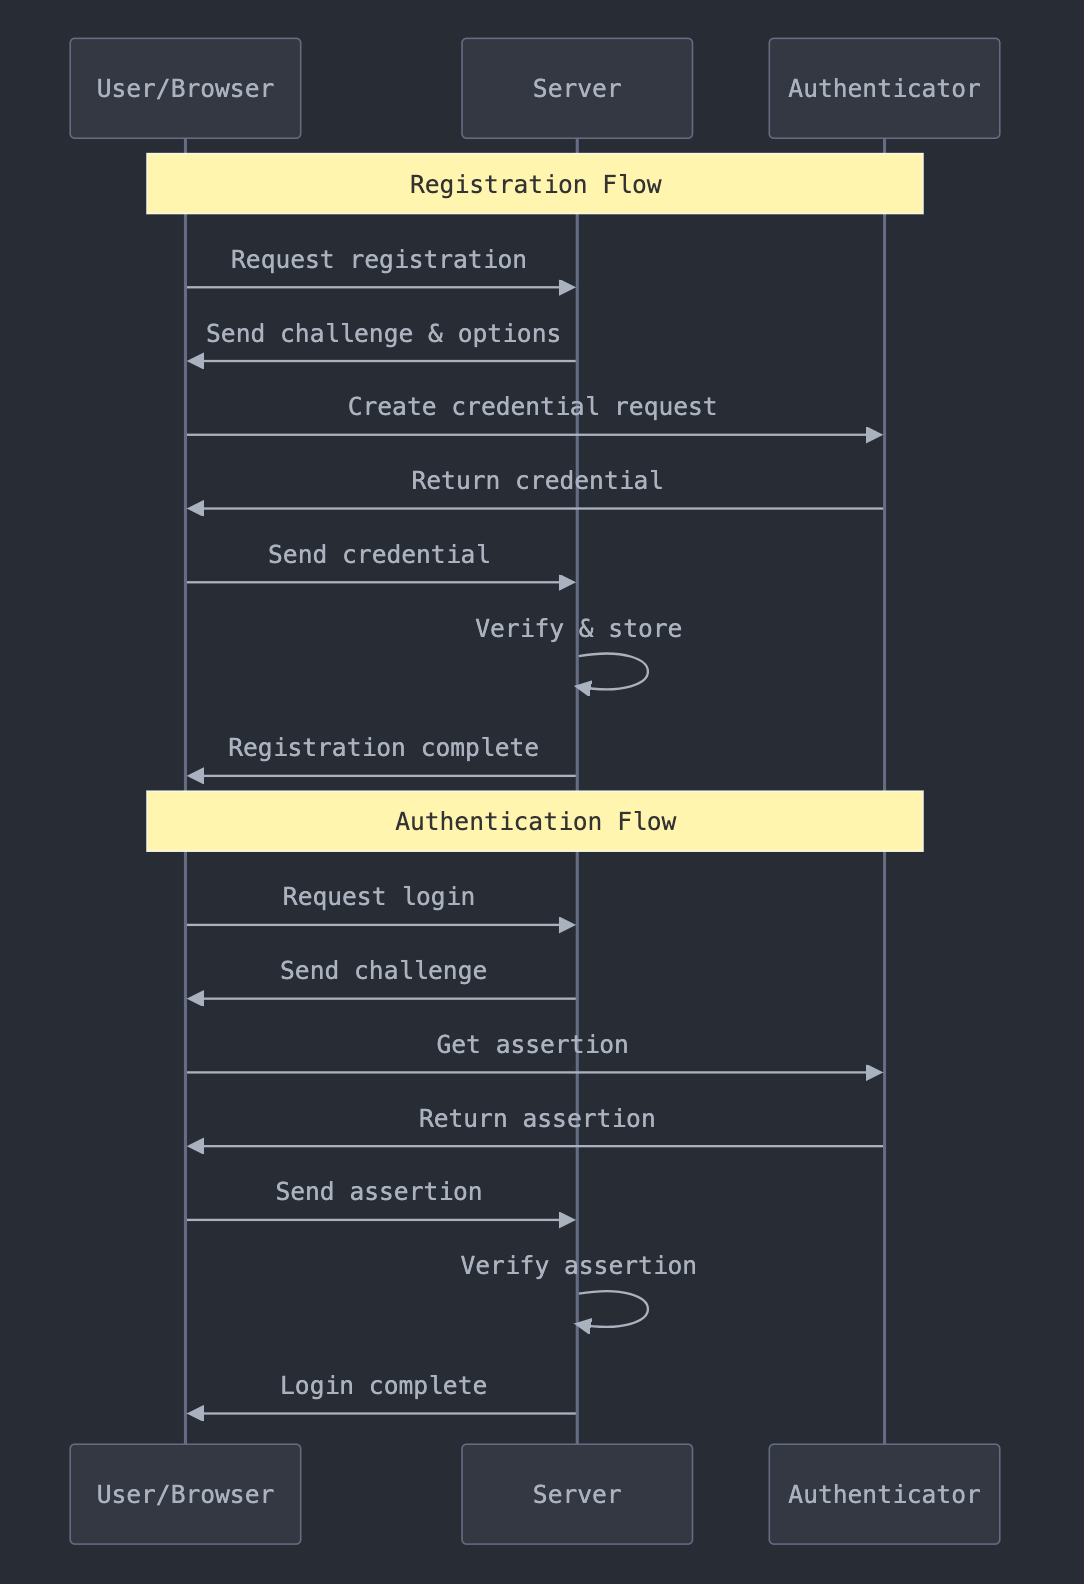
- User registration with FIDO2 credentials
- Passwordless login using those credentials
- Secure session management
What You'll Need
// Required packages for Node.js
npm install fido2-lib express body-parser
Hardware Requirements
- Authenticator Devices: FIDO2-compatible security keys (e.g., YubiKey 5 Series) or biometric devices like fingerprint scanners.
- Development Machine: A computer capable of running a web server and accessing the internet.
- Test Devices: Multiple browsers and devices for cross-platform testing.
Software Requirements
- Programming Language: Knowledge of JavaScript for client-side and a server-side language like Node.js, Python, or Java.
- Web Server: Apache, Nginx, or any server capable of handling HTTPS requests.
- Databases: MySQL, PostgreSQL, MongoDB, or any database for storing user credentials.
- Libraries and Frameworks:
- Client-Side: Support for the WebAuthn API.
- Server-Side: FIDO2 server libraries compatible with your programming language.
Dependencies and Tools
- SSL Certificates: HTTPS is required for WebAuthn.
- Browser Support: Latest versions of Chrome, Firefox, Edge, or Safari.
- Development Tools: Code editor (e.g., Visual Studio Code), Postman for API testing.
Basic Architecture
┌──────────────┐      ┌──────────────┐      ┌──────────────┐
│              │      │              │      │              │
│   Browser    │ ←──► │    Server    │ ←──► │  Database    │
│  (WebAuthn)  │      │  (FIDO2Lib)  │      │              │
│              │      │              │      │              │
└──────────────┘      └──────────────┘      └──────────────┘
Step-by-Step Guide
1. Server Setup
First, let's set up our Express server with FIDO2 capabilities:
const express = require('express');
const { Fido2Lib } = require('fido2-lib');
const app = express();

// Initialize FIDO2
const f2l = new Fido2Lib({
  timeout: 60000,
  rpId: "example.com",
  rpName: "FIDO Example App",
  challengeSize: 32,
  attestation: "none"
});

app.use(express.json());
2. Registration Endpoint
Create an endpoint to start the registration process:
app.post('/auth/register-begin', async (req, res) => {
  try {
    const user = {
      id: crypto.randomBytes(32),
      name: req.body.username,
      displayName: req.body.displayName
    };

    const registrationOptions = await f2l.attestationOptions();

    // Add user info to the options
    registrationOptions.user = user;
    registrationOptions.challenge = Buffer.from(registrationOptions.challenge);

    // Store challenge for verification
    req.session.challenge = registrationOptions.challenge;
    req.session.username = user.name;

    res.json(registrationOptions);
  } catch (error) {
    res.status(400).json({ error: error.message });
  }
});
3. Client-Side Registration
Here's the frontend JavaScript to handle registration:
async function registerUser() {
  // 1. Get registration options from server
  const response = await fetch('/auth/register-begin', {
    method: 'POST',
    headers: { 'Content-Type': 'application/json' },
    body: JSON.stringify({ username: 'user@example.com' })
  });
  const options = await response.json();

  // 2. Create credentials using WebAuthn
  const credential = await navigator.credentials.create({
    publicKey: {
      ...options,
      challenge: base64ToBuffer(options.challenge),
      user: {
        ...options.user,
        id: base64ToBuffer(options.user.id)
      }
    }
  });

  // 3. Send credentials to server
  await fetch('/auth/register-complete', {
    method: 'POST',
    headers: { 'Content-Type': 'application/json' },
    body: JSON.stringify({
      id: credential.id,
      rawId: bufferToBase64(credential.rawId),
      response: {
        attestationObject: bufferToBase64(
          credential.response.attestationObject
        ),
        clientDataJSON: bufferToBase64(
          credential.response.clientDataJSON
        )
      }
    })
  });
}

// Helper functions
function bufferToBase64(buffer) {
  return btoa(String.fromCharCode(...new Uint8Array(buffer)));
}

function base64ToBuffer(base64) {
  return Uint8Array.from(atob(base64), c => c.charCodeAt(0));
}
4. Authentication Flow
Server-side authentication endpoint:
app.post('/auth/login-begin', async (req, res) => {
  try {
    const assertionOptions = await f2l.assertionOptions();

    // Get user's registered credentials from database
    const user = await db.getUser(req.body.username);
    assertionOptions.allowCredentials = user.credentials.map(cred => ({
      id: cred.credentialId,
      type: 'public-key'
    }));

    req.session.challenge = assertionOptions.challenge;
    req.session.username = req.body.username;

    res.json(assertionOptions);
  } catch (error) {
    res.status(400).json({ error: error.message });
  }
});
Client-side authentication:
async function loginUser() {
  // 1. Get authentication options
  const response = await fetch('/auth/login-begin', {
    method: 'POST',
    headers: { 'Content-Type': 'application/json' },
    body: JSON.stringify({ username: 'user@example.com' })
  });
  const options = await response.json();

  // 2. Get assertion from authenticator
  const assertion = await navigator.credentials.get({
    publicKey: {
      ...options,
      challenge: base64ToBuffer(options.challenge),
      allowCredentials: options.allowCredentials.map(cred => ({
        ...cred,
        id: base64ToBuffer(cred.id)
      }))
    }
  });

  // 3. Verify with server
  await fetch('/auth/login-complete', {
    method: 'POST',
    headers: { 'Content-Type': 'application/json' },
    body: JSON.stringify({
      id: assertion.id,
      rawId: bufferToBase64(assertion.rawId),
      response: {
        authenticatorData: bufferToBase64(
          assertion.response.authenticatorData
        ),
        clientDataJSON: bufferToBase64(
          assertion.response.clientDataJSON
        ),
        signature: bufferToBase64(
          assertion.response.signature
        )
      }
    })
  });
}
Common Challenges & Solutions
1. Browser Compatibility
// Check if WebAuthn is supported
if (!window.PublicKeyCredential) {
  console.log('WebAuthn not supported');
  // Fall back to traditional authentication
  return;
}

// Check if user verifying platform authenticator is available
const available = await PublicKeyCredential.isUserVerifyingPlatformAuthenticatorAvailable();
if (!available) {
  console.log('Platform authenticator not available');
  // Consider security key instead
}
2. Error Handling
// Client-side error handling
try {
  const credential = await navigator.credentials.create({/*...*/});
} catch (error) {
  switch (error.name) {
    case 'NotAllowedError':
      console.log('User declined to create credential');
      break;
    case 'SecurityError':
      console.log('Origin not secure');
      break;
    default:
      console.error('Unknown error:', error);
  }
}
3. Base64 URL Encoding
function base64UrlEncode(buffer) {
  const base64 = bufferToBase64(buffer);
  return base64.replace(/\+/g, '-')
               .replace(/\//g, '_')
               .replace(/=/g, '');
}
Testing Your Implementation
1. Basic Test Suite
describe('FIDO2 Authentication', () => {
  it('should generate registration options', async () => {
    const response = await fetch('/auth/register-begin', {
      method: 'POST',
      headers: { 'Content-Type': 'application/json' },
      body: JSON.stringify({ username: 'test@example.com' })
    });
    const options = await response.json();

    expect(options).toHaveProperty('challenge');
    expect(options).toHaveProperty('rp');
    expect(options.rp.name).toBe('FIDO Example App');
  });
});
2. Virtual Authenticator Testing
// Using Chrome's Virtual Authenticator Environment
const virtualAuthenticatorOptions = {
  protocol: 'ctap2',
  transport: 'internal',
  hasResidentKey: true,
  hasUserVerification: true,
  isUserConsenting: true
};

const authenticator = await driver.addVirtualAuthenticator(
  virtualAuthenticatorOptions
);
Security Best Practices
- Always Use HTTPS
if (window.location.protocol !== 'https:') {
  throw new Error('FIDO2 requires HTTPS');
}
- Validate Origin
const expectedOrigin = 'https://example.com';
const clientDataJSON = JSON.parse(
  new TextDecoder().decode(credential.response.clientDataJSON)
);
if (clientDataJSON.origin !== expectedOrigin) {
  throw new Error('Invalid origin');
}
- Challenge Verification
if (!timingSafeEqual(
  storedChallenge,
  credential.response.challenge
)) {
  throw new Error('Challenge mismatch');
}
Production Checklist
✅ HTTPS configured
✅ Error handling implemented
✅ Browser support detection
✅ Backup authentication method
✅ Rate limiting enabled
✅ Logging system in place
✅ Security headers configured
Next Steps
- Implement user presence verification
- Add transaction confirmation
- Set up backup authentication methods
- Configure audit logging
- Implement rate limiting
Resources:
- WebAuthn Guide
- FIDO2 Test Tools
- Sample Implementation
Need help? Join Discord community for support.
More like this
All Identity & CIAM- Identity & CIAMPasswordless Authentication in 2026: 5 Methods Compared and How to Roll It OutPasswords are responsible for 80% of data breaches. Passwordless authentication eliminates the attack surface entirely.
- Identity & CIAMPasskeys Hit Critical Mass: Microsoft Auto-Enables for Millions, 87% of Companies Deploy as Passwords Near End-of-LifeMarch 2026 marks passwordless tipping point: Microsoft forces passkey migration, regulatory deadlines hit, and adoption surges to 69% of…
- Identity & CIAMSilent Network Authentication: The Invisible Layer Replacing SMS OTP in 2026Silent Network Authentication verifies users in 1-4 seconds using SIM cryptography without any user action.
Get new Identity & CIAM writing
Enjoyed this? Subscribe and tell us what you read most. Identity & CIAM is already ticked for you. No tracking pixels, unsubscribe with one click.